2011年8月22日月曜日

[TIGER & BUNNY] "Barnaby Brooks Jr." ―part.2

http://airily.jp/

Hi there, how's it going?

Today's theme is Barnaby Brooks Jr. from TIGER & BUNNY.
It is a continuation of last article.

Last article is → here


Let's get started!


I fasten hair by finger after using curling iron for a while...


I can make curling hair like letter "C"


I ever heard Airily wig is hard to form even if it use curling iron.
Because Airily wig is heat-resistance. 

However I could do it by above method.

If you want to do it more quickly,
Cool hair rapidly and put hair spray on a wig after using curling iron.


OK, next step.


Take hold of side hair.


Wind around hair by curling iron.


Fasten hair by finger as you like.


Do it again for 2nd layer.


Make big curl for 3rd layer.


It will be like this.

I fix residuary part of the hair for makeready.


Next, bangs.


Part the hair as four blocks.
Cut hair as the left sides shorten.


I make bangs like spiral.
Fasten hair by finger until spiral become fixed.


It is good, isn't it?

Airily's "Visual Wig" is very natural at the top of the head.
Because we are particular about hair transplant without artificiality from hair whorl on the head.

How to make bangs softly is...


Take hold of bangs and hair which is combed back.


Can you see the bangs look solid?
To make a silhouette that longer than it is wide, it gain in good‐looking.


Fix whole hair at last...


I can make the hair of Barnaby Brooks Jr. from TIGER & BUNNY!
I did it!


with glasses.


Barnaby Brooks Jr. is the most suitable character to use "Visual Wig"
He is a character of animation but he is stylish.

Airily's "Visual Wig" is very useful.
I think it is too good for only wear it for daily use.
"Visual Wig" has superb amount of hair in back and very natural at the hairline.
So you can arrange easily to curl hair.


Thank you so much to reading.

See you next time!

2011年8月15日月曜日

[TIGER & BUNNY] "Barnaby Brooks Jr." ―part.1

http://airily.jp/

Hi there, how's it going?

Today's theme is Barnaby Brooks Jr. from TIGER & BUNNY.

This is a wig that I use this time.

"Visual Wig" color:maroon
[PC]http://airily.jp/article/VS001-009-2

Above Visual Wig is useful to make natural style.
Our customer said "I cut just bangs and I wear it for daily use."

Why can Visual Wig make natural style?

Because it has natural hair whorl that looks like human hair whorl.
It was produced to draw a spiral from the top of head man‐made beauty scalp.
Of course you can make it as raise, hop...anyway you want as if you arrange your own hair.

You can enjoy various hair style owing to use Visual Wig.

Oops, sorry, I talked too much about Visual Wig as a commodity.


Let's get to start hair arrangement.


First of all, the entire upper, middle, split the bottom.

First, part of the bottom,
Cut nape of the neck in the length of attaching to the shoulder.

Next, part of the middle,
Pick up hair ends with confirming hop of hair,

At last, part of the upper,
Sharpen it to move hair ends,  
Please refer the picture when you decide the length.

Leave side hair for characterized hop.

I did it!
Do you think my hair cut is good?

Airily wigs were cut by the professional beautician from the beginning.
So you can make beautiful hair style easily, even if you are a beginner of hair cut.


After hair cut, I make hopping hair.

Take regular hair of the upper with carefully using a comb.

Hold it barrette and spray water.

Make hopping hair with curling iron.


This is new 32mm curling iron colored by pink!!
(previous curling iron was 19mm colored by silver)

This curling iron is the product of Vidal Sassoon.
Made of ceramic, also "speed-start" on board.
You can make big curl easily!

After heat spreads in the placed hair ends,
take it by your finger as a shape of hop you want.

You can see the difference between wigs and real hair in this process.

Wig is shaping when it cool down.


Then, I'll show you the result of hopping hair on next time!

You will not regret to wait!

See you next time!

2011年7月12日火曜日

[Sengoku BASARA] "Sanada Yukimura" ―part.2

http://airily.jp/

Hi there, how's it going?

This is a continuation of the previous article.

Today, I'll add Hair bundle to nape of the neck.
It is the greatest point of Yukimura's hair arrangement.

This is a wig "Wolf Base 2nd" I use this time.


"Wolf Base 2nd" color:milk chocolate brown
[PC]http://airily.jp/article/WS007-008

"hair bundle(Extension)" color:milk chocolate brown
[PC]http://airily.jp/article/WK019050-008

This time, I'll show you how to add Hair bundle to nape of the neck with hair pins.
It is easy way even if you are a beginner of hair arrangement.
It will be able to retain a shape during a day of cosplay event.

Anyway, Let's get start hair arrangement.

First,
Collect hair up to the top.


Can you see the arrow in following picture?


Please confirm the base of wig.

Next,
From the bottom up, I set hair pins to keep hair.


It was firmly fixed.
I used two hair pins to keep hair.
I set hair pins at right and left end and middle of wig.


It became long.
I braid it with rubber...


I did it!

If you would like to wind the ribbon knot on top of circles, it is good to hide a base of wig and hair pins.
Also it may look like Japanese hair style moreover.

I put this wig on a mannequin's head.
Mannequin, she is so beautiful.


I could make Sanada Yukimura's hair style, master!


In my opinion, Airily's Hair bundle is very good at hair arrangement.
Because the quality is so high.
There are amount of hair.
However it braid through the rubber smoothly.
It is very easy to use.


How about "Sanada Yukimura's cosplay" for summer?
I think Yukimura's costume is to be suited in summer.
It's no problem because it is hot outside.

My friend caught a cold in Yukimura's costume on February, Winter.
Because it was cold outside...gosh.


Thank you for reading!

See you next time!

http://airily.jp/

2011年7月8日金曜日

[Sengoku BASARA] "Sanada Yukimura" ―part.1

http://airily.jp/

Hi there, how's it going?

Today's theme is Sanada Yukimura from Sengoku BASARA.

I'll show you how to use hair bundle (Extension)
It may serve as a reference for beginner of hair arrangement.

This is a wig "Wolf Base 2nd" I use this time.


"Wolf Base 2nd" color:milk chocolate brown
[PC]http://airily.jp/article/WS007-008

"hair bundle (Extension)" color:milk chocolate brown
[PC]http://airily.jp/article/WK019050-008


I'll cut and arrange "front part" as the central point of this time.
Hair bundle will add to nape of the neck.

First, Bangs.
It is too long for Yukimura just a little bit...

Cut boldly.
and go deep with a vertical cut into a pair of scissors...

Bangs look like zigzag.
I could make a basis of Bangs.


Let's get start next step.

Yukimura's hair is distinguished by sharp hair from the top of his head.
and it is the characteristic hair of Yukimura.


Comb and take hair from top to Bangs with fingers...


How about it?
It looks wild silhouette, right?

Next, side hair.


It is too long for Yukimura just a little bit...
so I cut it shortly...


Steps↓
1, You see the balance of the length roughly trimmed.
2, Coordinate of hair amount with comb hair little by little.
3, Fine tuning to the balance of overall.

If you want to cut hair of same length between right and left,
you may cut too much. so please be careful to cut.

You cut it carefully.

Well, I finished cutting "front part"
I think it has become considerably as Yukimura.


Then, the next time, I'll keep going to arrange it.
I'll add Hair bundle to nape of the neck.

See you next time!

http://airily.jp/

2011年6月22日水曜日

[blog with dynamic images]How to cut Bangs

http://airily.jp/

Hi there, how's it going?

This time, I will show you how to cut Bangs with dynamic images.

There are several dynamic images which of nearly five minutes, however, please check and watch them.

I use "Angel Bob" to make natural Bangs.
This is a basic hair cut for both boys character and girls character.

Dynamic image for 3 or 4 minutes:

Like this :

and then, I cut wig's back and side...


I did it!
I was able to make a style of boyish short hair.
It seems Gintama's "Okita", doesn't it?
An ardent request is being drawn by Okita.
Please refer this hair cut if you want to do Okita's cosplay.

This is a wig "Angel Bob" I used this time.


"Angel Bob" color : milk tea
[PC]http://airily.jp/article/WS001-013

Above color : "milk tea" is very similar to Okita's.

Airily wigs were cut by the professional beautician from the beginning.
So you can make beautiful hair style easily, even if you are a beginner of hair cut.


Let's get start next step.

I will try to cut Bangs like figure "V".

You often see this Bangs to good looking guys, right?

This is a wig "Wolf Base" I used this time.


"Wolf Base" color : orange brown
[PC]http://airily.jp/article/WS002-016

Above color : "orange brown" is very popular recently.
It is warm brown mixed orange and brown in the name of "orange brown",

Please purchase as soon as possible if you want.
Because "orange brown" is very popular.

How to cut Bangs with dynamic images.
First, part this Bangs as block and cut parts of lower layer.

Next, cut parts of center layer.


Lastly, cut surface of Bangs and make a shape.

Like this :

and then, I cut wig's back and side as same way...

Trim the hair end with wax :

I was able to make a style of good looking guys hair,
thanks to the Airily's beautiful "Wolf Base" wig!

When I use Airily wigs, I feel, I am very good at cutting and arranging wigs.

This time, I moved Bangs to the left just a little bit because I like it.
But if you move Bangs to the center, you can see the exactly "V" Bangs.

Even if you are a beginner of hair cut or arrange, you can be getting good as you gain experience.
You can enjoy arranging wigs much more.

All right!
See you next time!

http://airily.jp/

2011年5月23日月曜日

[Macros Flontier] "Alto Saotome"

http://airily.jp/

hi there:)
Today's theme is Alto Saotome from Macros Flontier.
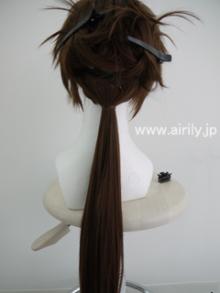
This character's making point is, you know, the pony tail.
somebody make it using bance, and others may use long wigs.
this time, let's use long layer for him.

WL002-031
[PC]http://airily.jp/article/WL002-032
[MB]http://airily.jp/m/article/WL002-032?


Step1.  divide side hair to cut the bang.


cut the bang except the center part for Alt.
Step2. cut side hair for straight.
see a picture near by.
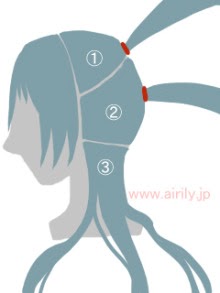
Step3.  look at the picture :)
you can see numbers on it, and make a pony tail
along the numbers step.
divide back hair for 3 parts,
and gather them one by one.  


then conbine 1 and 2.
after conbined, take 3 to tease it's hair and
gather 1+2 and 3.

here we are!
this way to make a pony tail is one of the idea :)
ok see you next!